Category archive

Teaching - page 2

Teachers helping teachers: Find and share classroom tips, research, experiences, and stories.

Success with Less: The 20-Minute Formula for Better Lesson Planning

in Teaching

For most teachers, the best part of the job is the actual teaching. We love engaging with our students in class and creating those “lightbulb” moments of clarity. The part of the job that most teachers don’t love? Lesson planning. Here’s why, and what you can do to make lesson planning easy and effective.

Planning can be time-consuming, stressful, and overwhelming. Most dedicated teachers end up doing far more preparation than they get paid for. School directors often expect (or even require) detailed lesson planning, but give little guidance on how to go about it.

So it’s no wonder that many teachers view lesson planning as a necessary evil.

But here’s the thing – it doesn’t have to be. With the right strategies, you can plan lessons that are more effective and more fun, without the guesswork and stress. And you can drastically reduce how long it takes.

Choose ONE Main Focus

When choosing a focus for your lesson, less is actually more. My golden rule for effective lesson planning is this: It’s better to teach a lot about a little rather than a little about a lot.

Here’s why it matters.

Option 1

You teach a lesson in which the students learn some new adjectives related to jobs, then they do a listening exercise about climate change, and then they study the present perfect before writing a short paragraph about their hobbies. The lesson ends with a class debate about the pros and cons of social media.

The students leave with their heads full of new information. But because the focus was on so many different things, they didn’t get a chance to master any of it. In fact, they can’t even remember a lot of it.

Option 2

You teach a lesson on 8 vocabulary words related to work. The students start by having a short discussion in pairs about what kind of job they would like, then read a sample job advertisement which contains the target vocabulary words for the lesson. From there, you clarify the meaning, form, and pronunciation of the 8 words before the students practice those same words in a “describe and guess” flashcard game. The lesson ends with a job interview role play in pairs.

The students leave feeling confident that they can use all the vocabulary they learned in the lesson. They certainly don’t know all the words in English related to work yet, but they now feel much better prepared to talk about work in English.

It’s better to teach a lot about a little rather than a little about a lot.

Clearly, option 2 is more useful for the students. Option 1 had so many different aims that the students didn’t end up confident in any of them. Option 2 provided one clear focus. By the end of that lesson, the students’ abilities had noticeably improved in that particular area.

The first step in planning a successful lesson is to choose one of the following skills or systems for each 60-90 minute lesson:

  • reading
  • listening
  • speaking
  • writing
  • grammar
  • vocabulary
  • functional language

Obviously, any lesson will contain almost all of these aspects in one way or another. The point is to make only one the main focus and then build your entire lesson around that.

Use the Right Framework

Once you’ve determined the lesson type from the list above, the next step is to use a lesson framework. A framework is basically a template or outline corresponding to the lesson type. It’s made up of a list of stages (typically with one activity per stage) and each stage has an aim (a justification for how that stage contributes to achieving the main aim of your lesson).

The framework you use is determined by the type of lesson you’re teaching. A listening lesson has a different framework than a grammar lesson. Because these are very different aspects of English, the way we approach teaching them will be different.

For example, a reading lesson framework might look like this:

Stage Aim
Lead-in to set the context of the lesson; to engage with the topic and warm up
Gist Reading Task to practice skimming for the main idea of the text
Vocabulary Pre-teach to clarify potentially blocking words in the text
Detailed Reading Task to practice reading intensively, for more in-depth comprehension
Productive Task to practice speaking fluency in the context of the text

So any time you teach a reading lesson, you can use this same framework – just with a different text and relevant activities for each stage.

Lesson frameworks are the #1 way to streamline your planning process and make your lessons more effective. Once you’re familiar with the different frameworks, no longer have to waste time thinking about what kind of activity to plan next or how much to include in your lesson. You simply follow the outline.

Get the Most Out of Your Material

Another benefit of using a framework is that it helps you shape your material into a cohesive, intentional lesson. If you’re teaching from a coursebook, you can now evaluate what’s on the page and determine which activities fit into your framework and which don’t. Take the activities you need, slotting them into the appropriate stages, and cut out the rest. Is the coursebook page missing a gist task? No problem – now you know exactly what you need to supplement.

Remember – less is more. Your entire reading lesson should be designed around one text. Your entire vocabulary lesson can be designed around one set of 6 – 10 vocabulary words. The beauty of this is that you get the most possible mileage out of your material, and you don’t spend time looking for a bunch of different random activities to fill up your lesson time.

You can use frameworks with authentic material as well. Perhaps you’ve found a short TED Talk you’d like to use for a listening lesson. Use the listening lesson framework to inform the activities you design around the video.

Tips for Saving Time

picture of an hourglass on a table top

Once you get really comfortable with the different lesson frameworks, these will be your biggest timesaver, because you’ll no longer have to create lessons out of thin air. You’ll have a handy template up your sleeve for any possible lesson type or material.

If you’re looking to reduce your planning time even more, here are a few additional tips help you.

  1. Plan backwards. Can I let you in on a lesson planning secret? Plan the most important activity first. And the most important activity in your lesson should never be your lead-in. The lead-in is just there to quickly introduce the topic and get the students engaged. In a 60-minute lesson, this should take five minutes or less.

If you start planning the lead-in first, it’s easy to fall down a rabbit hole of activity options. Should I start by showing a picture or a video clip? Should the students discuss some questions in pairs? Before you know it, you’ve spent 30 minutes “planning” and haven’t even worked out the first activity yet.

Instead, start with the “main event” of your lesson. For example, in a reading lesson, this would be the detailed comprehension task. If you’re using a coursebook, this will most likely already be provided for you. Boom! That stage is done. Now work backwards from there. By the time you get to the lead-in, the rest of your lesson will be planned, and all you need to do is tack a quick 5-minute warm up activity (in the context of your reading text) onto the beginning.

  1. Set a timer. If you find yourself spending an hour or more planning a single lesson, my timer trick may help. Set a timer for 15 or 30 minutes and tell yourself you have to have the lesson planned by the time it goes off. You don’t need to have the perfect visuals ready to go or all your instructions written out. You just need to have enough so that you could feasibly walk in and teach it: the stages, plus the aim and activity for each stage.

Challenge yourself to put the lesson together without worrying about every little detail. THEN go back and add any necessary embellishments afterwards, once the timer has gone off. You may even realize you don’t need to add on as much as you thought.

  1. Build up your resource library. I recommend keeping a folder (physically or digitally) with your favorite activity ideas. That way, you can easily pull one out whenever you need to supplement a stage in your lesson.

And remember – just because the activity doesn’t focus on the exact grammar point you need, it doesn’t mean you can’t use it. Many activities can be easily adapted to practice different language. For example, a game like Find Someone Who can be used to practice anything from the present simple (“Find someone who plays tennis / has a dog / speaks 3 languages”) to the present perfect continuous (“Find someone who has been studying English for more than 5 years / has been living in the same house since they were a child”).

If you like the format of the activity, you can save a lot of time by creating different versions of it rather than trying to find something that’s already tailor-made for the exact language point you’re teaching.

If you’re looking for more guidance on your teaching and planning, feel free to stop by teflhorizons.com. You can also download the free Guide to Lesson Frameworks here for an easy reference.

***

Immigration in Germany: Fostering Nuanced Debate in the ELT Classroom

in Teaching

Like many western countries, Germany is becoming increasingly multicultural and diverse. Sophia Burton from Migration Matters explains how we can raise awareness about the complex reality of migration in the classroom and help students have healthy, evidence-based discussions about it.

Do you see Germany as a country of immigration? This question can be looked at through various perspectives:

  • how much diversity we (think we) see on the streets around us
  • whether political parties acknowledge immigration’s importance and create laws and policies around it
  • or even whether someone personally feels welcome as an immigrant

If we want to focus on the numbers, they can tell us the following: About 14% of Germany is foreign-born, a figure comparable to that of the United States. And over one fourth of Germany’s residents have a so-called “migration background”, a term denoting someone with at least one parent who did not receive German citizenship by birth.*

Students in Germany indisputably live in a diverse society. However, the reality of Germany as an immigration society is not systematically reflected in curricula.**

Thus, migration-related challenges and issues of diversity and identity are rarely addressed. As a result, students often have limited tools to participate in debates about diverse and inclusive societies. So how can we introduce migration as a topic in the classroom and foster healthy, nuanced discussions about it?

Migration: Go beyond pro and con…

Migration is often presented as a divisive topic with a pro vs. con framework that does not honor the complexity of the debate nor people’s far more nuanced perceptions on the topic. Very few people feel entirely “pro” or “con” about migration – they can see both benefits and challenges.

Since migration is a topic with no clear answers or solutions, we don’t need to attempt to solve the debate in every discussion. It can be more productive to acknowledge we don’t have all the answers and share different arguments around topics like integration, borders, climate change’s relationship to migration, or identity.

The tools students can learn through these kinds of open discussions can also transfer to conversations about other difficult topics.

… but keep it evidence-based

While it’s important to acknowledge various opinions and perceptions around migration to be inclusive of different views and spark discussion, it is also critical to keep the discussion evidence-based. Incorporating facts, research studies, and scientific findings is one big part of this equation. There are scholars from various disciplines who research migration from the perspectives of social science, political science, psychology, and more.

Studies and research findings alone are however often not enough to spark debate – teaching materials should have an approachable and accessible character to appeal to young people.

Incorporate a variety of  “expert” voices

Sharing multiple voices with students can make the topic of migration more approachable and accessible. Personal stories, for instance, can help capture students’ attention and draw them into the topic (Example: Our I Am European series that shares the stories of 17 young people across Europe).

video series on migration in Europe

Debates about migration and refugees are also often lacking those most affected: migrants and refugees. At Migration Matters, we believe that those with lived experience are expert voices in their own right.

Incorporating digital storytelling into the classroom

Digital storytelling can be an effective tool for building understanding and empathy when it comes to complex topics like migration. It can make evidence and research more accessible and challenge misconceptions and stereotypes. Amplifying the voices of migrants and refugees helps to encourage dialogue and the sharing of diverse perspectives.

It can be something you “import” into the classroom (Migration Matters has over 150 videos for you to pull from!) or  a task you can have students do on the topic, creating their own digital stories – even in the very basic form of a TikTok or Instagram reel – about their communities and surroundings.

Start with a bold statement, end with a question

It can be tempting to start off a discussion with a question and try to end with an answer. At Migration Matters, we tend to format our educational videos and materials in the reverse way. We start with a bold statement, either from someone on the street or an academic or migrant, and end our videos with a question. The former serves to provoke interest and kick off debate and the latter encourages reflection and further discussion.

About Migration Matters and getting involved

Migration Matters e.V. (MM) is a media NGO founded by four migrant women in 2016 in response to media coverage about the so-called ‘refugee crisis’ with the mission of helping the public navigate complex issues related to migration.

Through media productions and events, the MM team makes research, evidence, and original perspectives on migration and diversity issues accessible to the public to encourage evidence-based debate and, ultimately, to combat increasing polarization and discrimination.

Get in touch with us if you’re interested in learning more, inviting us to your classroom, or have feedback on our videos: team@migrationmatters.me. We are currently looking for a handful of schools in Berlin for which to conduct migration-focused workshops in 2023.

If you enjoyed this article, you might also like Richard’s story of teaching English for charity in the Philippines.

References

*Statistisches Bundesamt: Mikrozensus, 2021

** MIDEM Lehrplanstudie – Migration und Integration, 2021

Getting Help from Our New Robot Overlords – ChatGPT in the Classroom, Article 2

in Teaching/Uncategorised

Editor’s Note:


This article and this article are siblings.
They are both on the same subject – using ChatGPT (an artificial intelligence writing programme) in the classroom.

Can you guess which article the real human wrote, and which one the robots-who-will-soon enslave-us-all developed?

The answer will be published in the Newsletter!

(And here, in a while)

The prompt was:

“Please write an article about the potential of using ChatGPT in the ESL classroom, including examples of how you have used ChatGPT in the classroom; the target audience is ESL Teachers.”

and the AI wrote an article in less than a minute.


As an ESL teacher, I am always looking for new and innovative ways to engage my students and help them improve their language skills. One tool that has proven to be incredibly useful in my classroom is ChatGPT. ChatGPT is an AI-powered language model developed by OpenAI that can understand and generate human-like text. In this article, I will share my experience using ChatGPT in the ESL classroom and provide examples of how it can be used to enhance language learning.

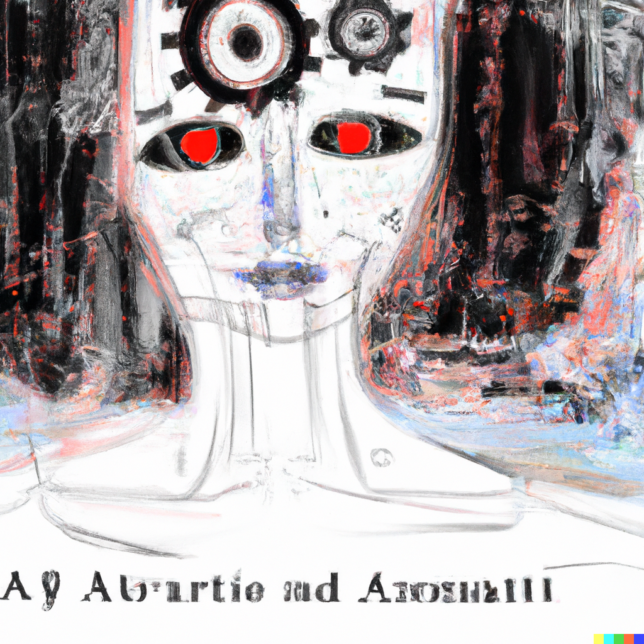
This rather terrifying drawing was produced by Dall-E AI image generation.

Writing Practice

One way I have used ChatGPT in my classroom is to provide writing practice prompts and feedback. I have found that using ChatGPT to provide prompts helps my students improve their writing skills by encouraging them to use a wider range of vocabulary and sentence structures. Additionally, ChatGPT’s ability to provide instant feedback on grammar and syntax errors is incredibly valuable.

For example, I might give my students a prompt such as “Write a paragraph describing your favorite food.” After they complete their paragraphs, they can submit them to ChatGPT for feedback. ChatGPT will provide feedback on grammar and syntax errors, as well as suggestions for improving the language used in the paragraph.

Another by Dall-E.
Eerily similar to the nightmares of school that haunt me to this day.

Speaking Practice

Another way I have used ChatGPT in my classroom is to help my students practice their speaking skills. ChatGPT can be used to provide speaking prompts and feedback in real-time. This is particularly useful for students who are shy or nervous about speaking in front of their classmates.

For example, I might give my students a speaking prompt such as “Talk about your favorite hobby.” After they have spoken for a few minutes, they can submit their speech to ChatGPT for feedback. ChatGPT will provide feedback on pronunciation, intonation, and grammar.

Reading Practice

ChatGPT can also be used to provide reading practice materials and questions. I have found that using ChatGPT to provide reading materials and questions helps my students improve their reading comprehension skills by encouraging them to read more challenging texts.


For example, I might give my students a passage to read, followed by a set of comprehension questions. They can submit their answers to ChatGPT for feedback. ChatGPT will provide feedback on their answers, as well as suggestions for improving their comprehension skills

In conclusion

ChatGPT has enormous potential for use in the ESL classroom. As an ESL teacher, I have found that it is an incredibly useful tool for helping my students improve their language skills. Whether it is providing writing prompts and feedback, speaking prompts and feedback, or reading practice materials and questions, ChatGPT is an invaluable tool for ESL teachers looking to enhance their teaching and provide more personalized learning experiences for their students.


For a real, human-generated lesson plan, why not check out our article on dictogloss here?

Or if you still haven’t got your tech-in-ELT fix, we have an article on what we can learn from the hugely popular app, DuoLingo.

Now, I’m off to apologise to my toaster for sticking a fork in it earlier – before it gains the sentience to stick the fork in me. – Ed.


Do you like Shaun’s writing? (Or have you just read the AI’s article?!) check out his websites at…

https://www.facebook.com/www.englishonline.training
and
https://englishonline.training/

Getting Help from Our New Robot Overlords – ChatGPT in the Classroom, Article 1

in Teaching

Editor’s Note:


This article and this article are siblings.
They are both on the same subject – using ChatGPT (an artificial intelligence writing programme) in the classroom.
Can you guess which article the real human wrote, and which one the robots-who-will-soon enslave-us-all developed?

The prompt was:

“Please write an article about the potential of using ChatGPT in the ESL classroom, including examples of how you have used ChatGPT in the classroom; the target audience is ESL Teachers.”

and the AI wrote an article in less than a minute.


ChatGPT and ESL, ESP use cases

The rise of AI technology has changed the way educators approach and deliver their subjects. Conversational AI will be no exception when it hits the classroom. ChatGPT from OpenAI, for example, is a large language model. Already, teachers can use this as a tool to improve language skills in an ESL setting. In this article, we will explore how teachers can use ChatGPT to enhance student learning and engagement.


This rather terrifying drawing was produced by Dall-E AI image generation.


Another by Dall-E.
Eerily similar to the nightmares of school that haunt me to this day.


What is ChatGPT? Explained in simple terms

​​ChatGPT is a a state-of-the-artcomputer program that can generate text based on a given prompt. It has been trained on a huge amount of data that includes conversations and language, so it can generate text in a way that resembles human writing and speech. They have trained it to generate text in a conversational tone and style. As a consequence of this, it is useful for creating chatbots and other conversational systems, where it can respond to user inputs in a natural and engaging way. In simple terms, you can think of ChatGPT as a virtual person who can carry on a conversation with you using text.

ESL Applications

Below are all specific real examples that I used in class or in preparation for students.


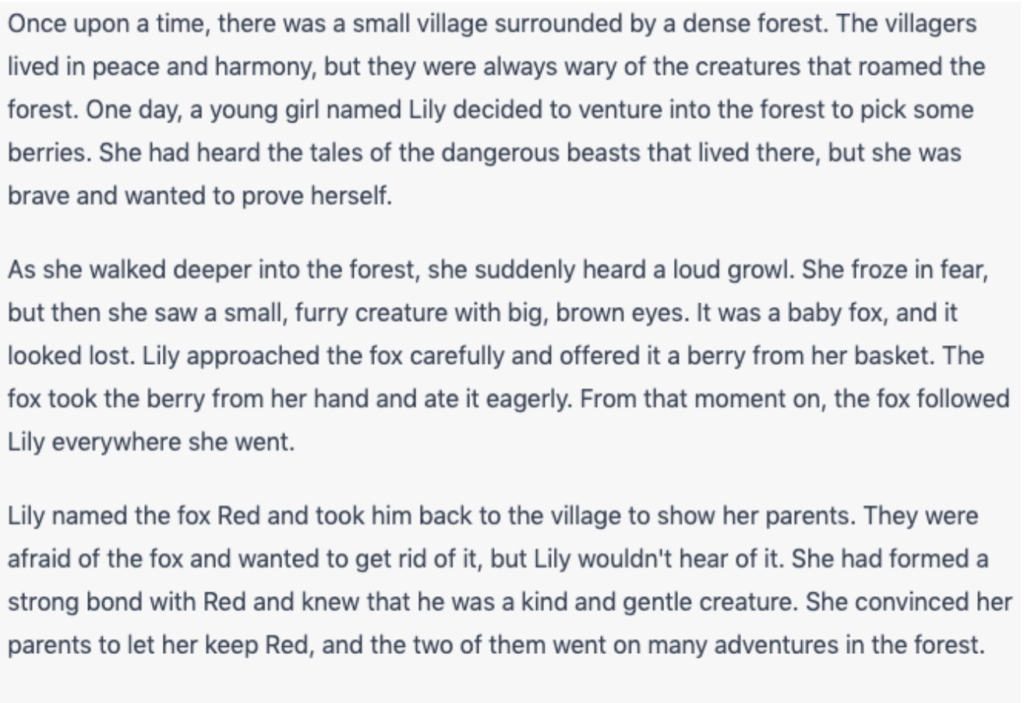
Write a story and get context questions from ChatGPT

I had been working on the past tense with a group of young learners. I was trying to be more imaginative, so I gave an input to write a story for 10 year olds.


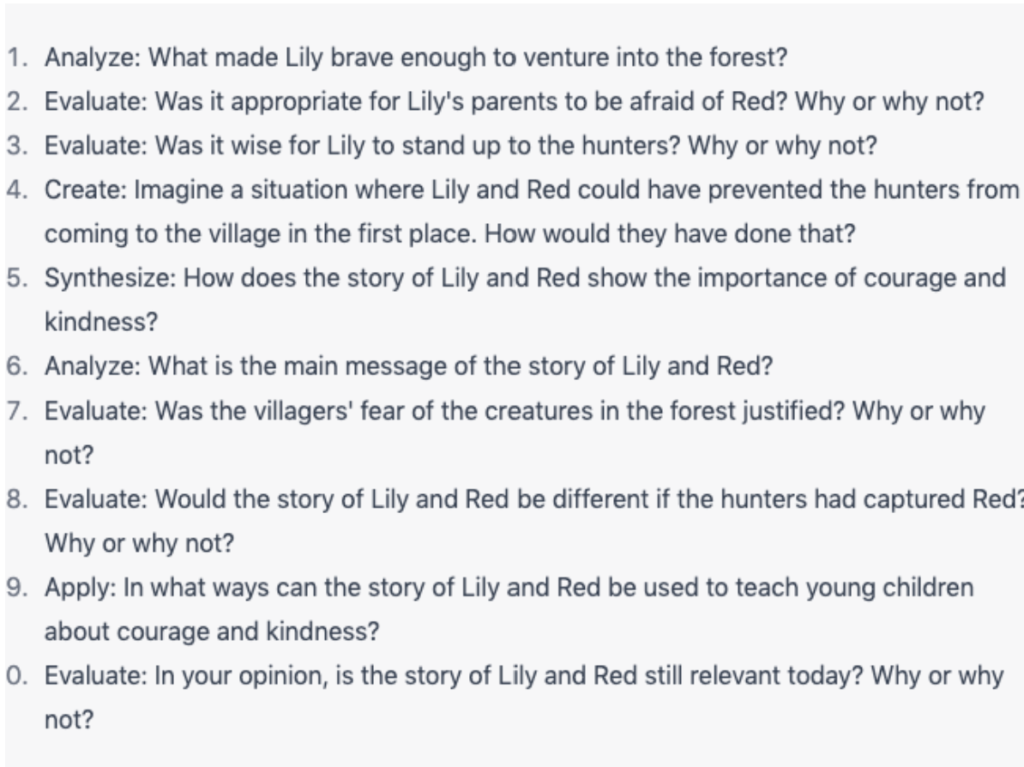
The first task was then to create some context questions based on the text.

What I wanted was more in-depth, higher order thinking, so I requested more questions, using Bloom’s Taxonomy.

Explaining grammar questions with examples

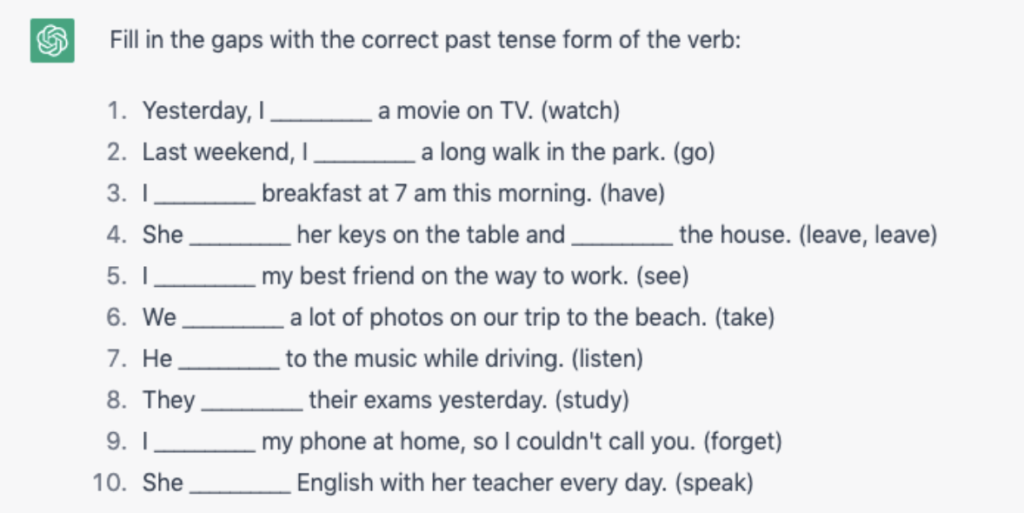
First I asked the AI to create a list of common past tense verbs, focusing on irregular forms. Then I asked it create a gap fill exercise based on those words.

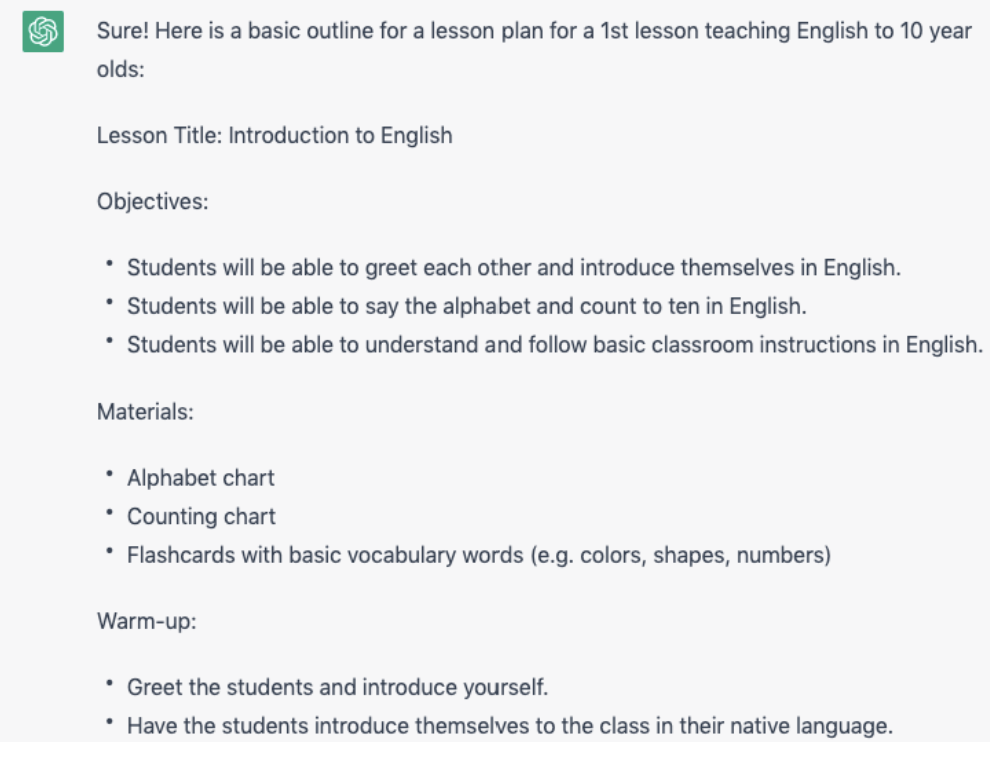
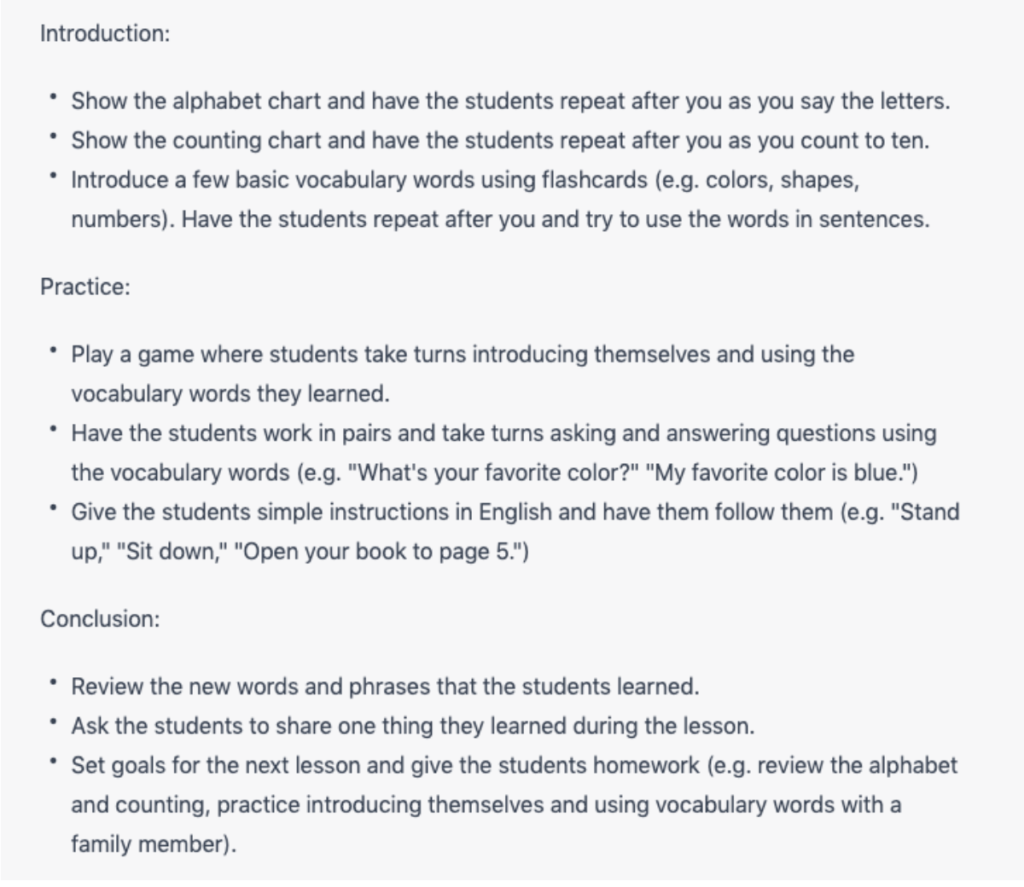
Create a lesson plan using ChatGPT

The more specific you can be when creating the questions, the better outcomes you get. I entered “Create a lesson plan for a 1st lesson, English for 10 year olds”:

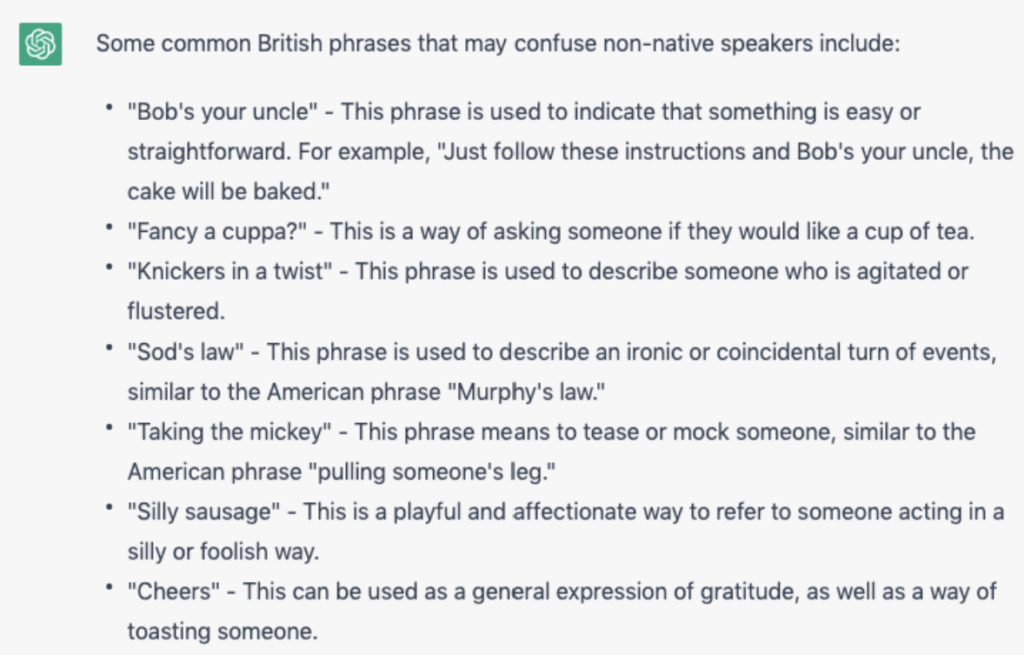
Create lists of idioms based on your requirements

A student asked me what are some typical British idioms that might confuse. In the lesson, I was able to ask and supply the below answers in seconds.

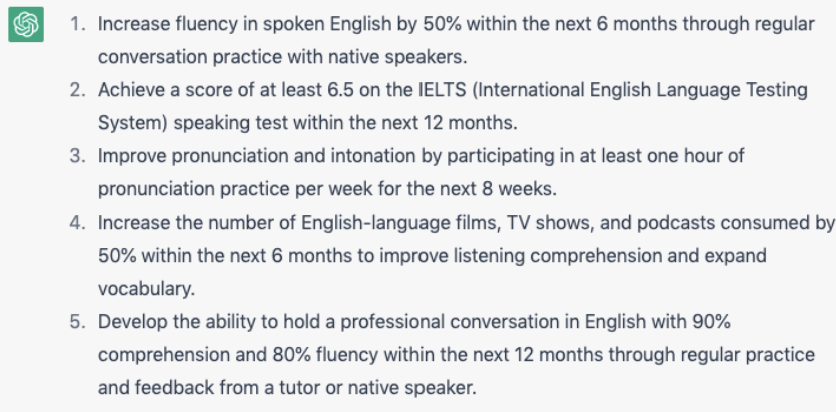
SMART goal setting

I asked 5 SMART learning outcomes for an adult who wants to improve spoken English as a foreign language. Again, the more specific you make your request, the more useful the answer will be.

ESP Applications


Acronyms

I have a high level student in the pharmaceutical field that struggles with the level of acronyms used in presentations. To help with this, I started off by creating a list of acronyms in this field, with definitions. At this point, I didn’t share these with the student.

Next I asked ChatGPT to put them into a short article, in context. I read this to my student. They had to identify which acronyms were in the article, and what they stood for.

After the first readthrough, we checked and discussed those which were clear and those which needed extra work. 


Technical explanations

I was proofreading a presentation with a student and the student reported one of the measurements as (µmol m^-2 s^-1). The topic was lighting and I understood micromol per square metre per second to be more of a chemical reaction.

As you can see it a measurement for lighting so all was good.


Signposting language in presentations

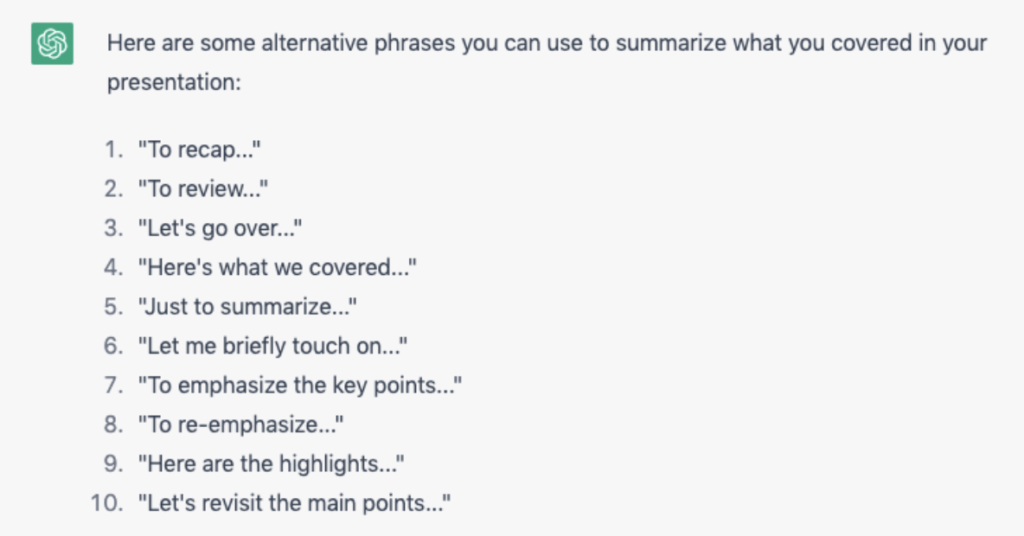
When listening to a presentation from a learner, they ended their speech quite abruptly – so I advised them to always signpost the fact you are about to finish, so that everyone knows to wake up and pay attention again. 

I asked them to repeat the final section of their talk and to incorporate a couple of these endings.

Risks of using Chat GPT in the classroom

Using ChatGPT in an ESL (English as a Second Language) classroom presents several risks.

Firstly, students may become too dependent on technology for their language practice, neglecting the importance of human interaction in building their communicative skills such as non-verbal communication, intonation, and pronunciation.

Secondly, the information provided by ChatGPT may sometimes be inaccurate or outdated. Additionally, ChatGPT can only provide language exposure within the scope of its training data. This means it may not expose students to a full range of real-life language. Furthermore, the text data that developers trained ChatGPT on may contain biases, such as gender and cultural biases. Teachers may inadvertently pass these on to students.


Add, don’t replace

Therefore, it is crucial for teachers to use ChatGPT as an addition to, rather than a replacement for, traditional language teaching methods. ChatGPT can be a useful tool for language practice, but we should use it in combination with human interaction and other forms of language practice to ensure that students receive a comprehensive language education.


Another issue is the facts may not always be totally accurate.


ChatGPT also shows very heavy bias towards American English.

What do you think? How can teachers use ChatGPT as a supplement to, rather than a replacement for, traditional language teaching methods? Can teachers ensure that AI doesn’t expose students to biases in language? How do you think teachers can use ChatGPT in an ESL classroom to maximise its benefits and minimise its risks?


For a real, human-generated lesson plan, why not check out our article on dictogloss here?

Or if you still haven’t got your tech-in-ELT fix, we have an article on what we can learn from the hugely popular app, DuoLingo.

Now, I’m off to apologise to my toaster for sticking a fork in it earlier – before it gains the sentience to stick the fork in me. – Ed.


Do you like Shaun’s writing? (Or have you just read the AI’s article?!) check out his websites at…

https://www.facebook.com/www.englishonline.training
and
https://englishonline.training/

Enhance your English Lessons with Fancy Visuals – Here’s how to Make Your Own Infographics

in Teaching

Infographics are a timely way to spice up your English lessons and intrigue your students. What’s more, they are easy and fun to create! Clare Catchpole explains how to make your own infographics and how to turn the process into a creative online class project.

As a teacher and materials writer, I’m always looking for ways to make my materials as engaging as possible, and the design tool Canva has become my best friend. Gone are the frustrations of trying to format dreary Word documents. Canva is far more intuitive to use and you can quickly put together colourful, personalised and professional looking documents, such as presentation slides, CVs, and (of course) infographics.

Sharing new skills with my students

Once I realised how simple it was to use Canva, I immediately saw the potential to utilise it in an online class project. For students, it allows them to be more creative visually with their work, and highlights the importance of presentation in getting a message across.

Why Infographics?

Infographics are a colourful and engaging way of presenting data. Background colours, graphics and a huge choice of fonts bring texts alive and make them easier to read.

Class time is precious, so you’d be forgiven for thinking that fiddling around with formatting just takes up too much time and distracts from the actual writing task. However, making it a collaborative group project means that all the decision making will be done in English. The process is just as important as the final product.

Moreover, skills in editing and presenting information are going to come in so useful for your students in future projects at school, at home and at work. In my experience, students feel a real sense of pride and achievement in creating something that looks professional.

The Project: “Make Your Own Infographic”

I devised the project for intermediate and above level students. It’s ideally suited to online teaching, but also could be used in a classroom where students have access to computers and the internet.

The objectives of the project:

• Learning basic design skills for presenting information
• Learning how to edit text from a video
• Building skills in collaboration
• Practicing the language of negotiation and decision making

The inspiration for this project came from a lesson I created on the topic of Skateboarding. It’s based on a short TED-Ed animated video and I used this to create my first infographic:

infographic skateboarding

The process of making notes from the video narration and editing it into text suitable for the infographic was interesting, and it’s a good challenge for students to try. It requires listening for the overall gist to pick out the main points, then either transcribing or paraphrasing sentences.

If you’d like to use the project with your class this this lesson could be used as a model for making an infographic using a video as the source of information.

Finding engaging content: TED-Ed Brief Histories videos

TED-Ed have made a number of animated “Brief History of…” videos available on YouTube. This will be the source of information that students will use to create their infographics. The topics are varied and quite fun. I have compiled them into a playlist:

TED-Ed Brief Histories Playlist

Each video is about five minutes long and the animation will not only help students to understand the content, but it can also inspire them when searching for appropriate images for their infographics. TED-Ed is a reliable and trusted source providing well-researched and fact-checked information.

Now over to you: A Step-by-Step Guide to Making Your Own Infographic

Before you download the Project resource pack (more on that later), first of all you definitely should try creating an infographic for yourself. Unless you know the students have all had experience editing with Canva, it will be necessary for you to demonstrate each stage of the project using screenshare.

Fortunately, it’s easier than you might think if you follow the steps below.

1. Subscribing and Setting Up a Canva Account

Once you’re on the Canva website, click on log in, if you’re already subscribed or if not select sign in. To subscribe to Canva.com you only need to have an email address and you can use the free version.

Canva home screen

Once you’ve signed in you’ll see the home page which give various options for different documents you might want to make. Select “Infographic”.

2. Using Templates

You should see this screen with a blank infographic. On the left hand side of the screen is a panel of tools. At the top you’ll find the “template” tool. Click this and a panel of different templates will appear.

canva infographic templatesThere is a search tool where you can put in keywords for the topic you are going to write about. Once you’ve entered some keywords lots of different templates will appear.

You can then choose a template that you think will work well for your project. This will save a lot of work if you just want to create something from scratch. Once you have selected a template you can start to work on it.

3. Setting up your Infographic Project

setting up infographic

A) The tool panel includes all the formatting tools you need:

• Templates – to search different template versions for your project
• Elements – for graphics/icons (with “Canva Pro” paid version you get a much bigger choice)
• Uploads – for images/video/audio you wish to upload from your device
• Text – creates headings, subheading, box of text
• Photos – from Canva’s own selection again, there’s a bigger choice with “Canva Pro”
• Background – select colours/patterns/shapes for the background
• Embed – you can embed videos and posts direct from YouTube, Facebook, Google Maps etc.

B) Save your infographic under a new name before you start

All the changes you make will automatically be saved, but you must give the project a name so you can easily find it again!

C) Click on the Share button

To share the project with other people, you’ll need to add their email address. This is also where you can download the final document in different formats or share it to social media.

D) It’s possible to zoom in and out of the document using this tool

So it’s easy to see the full document or work in detail on one section at a time.

4. Infographic Guidelines

You can play around with the overall design, using different background colours, fonts and graphics. Here are a few basic guidelines to follow:

Now you’ve had a go yourself, do you feel ready to share this new tool with your students?

If so, you can download this Online Creative Collaboration Project: “Make your Own Infographic” from the Express Yourself in English website.

This resource pack includes:

• A 4 x 60 minute Lesson Project + Homework (Complete lesson plan)
• Handouts include:
◦ Infographic student guide for the project
◦ Guidelines for how to make infographics
◦ “Ground Rules on Collaboration” infographic (and template version for class use)
• Language for Collaboration: Decision Making, Suggesting & Choosing – vocabulary sheet and exercises
• Final Reflections handout for the end of the project

You can download the complete resource pack as a zip file here.

Alternatively, check out Clare’s follow-up article, where she shares the complete resources plus more in-depth information on how to set up a collaborative online class project.

***

Go to Top