Category archive

Teaching

Teachers helping teachers: Find and share classroom tips, research, experiences, and stories.

Starting Your Activity Bank: Classroom Activities For New English Teachers

in Teaching

Seasoned English teachers have a bank of classroom activities that they can use on the spot and as the situation requires. New teachers don’t have this, and besides all the other new things they have to learn, they need to know some reliable and adaptable activities. So if you’re a new teacher, this article is for you.

The activities new teachers learn become the foundation of their activity bank, which will become the linchpin of their future lessons. With this in mind, I have identified three activities that, from my experience in training new teachers, make an excellent starting place for a new activity bank.

I would like to share these activities so that any new teachers might put them straight into use. If you are an experienced teacher, you may not find any new activities here, but you might get some inspiration for your next class.

Activities for you

It was hard to focus on just three activities here. However, I realised that often the most useful activities share the following features:

  • an adaptable language focus
  • they don’t require extensive knowledge of technology
  • they can be used with nearly any level

So here are the activities that have those features and which I feel new teachers have got the most mileage from.

1. A Class Survey

The class survey is a classic EFL activity, chiefly because it is easy to produce and helps students to practise all four skills.
Essentially, the students complete a survey of a set number of students in the class, which helps them to practise a specific language structure in a controlled group speaking and writing activity.

Preparation

Here’s an example of a very simple survey which was designed for lower level younger students. It includes some pre-made questions as models to prompt students to generate their own questions. It also includes space for students to write the names of the people they speak to.

Instructions

Distribute a copy of the survey to each student and demonstrate your example questions.
Then, elicit some examples of questions that students could create for their survey and get them to finish writing their questions on their survey.

Next, students stand up and speak to enough different people to complete their survey. The students mingle around the class and write the name of the person they spoke to and their answers on the survey.

Here’s that example survey again, this time it has been started, with some of the information included.

Potential uses

This group activity works well for a huge variety of language focuses. All you need to do is generate questions to fit your language aim, for example changing the focus from do questions to going to or future perfect or conditionals.

2. Strip Race

A strip race involves adapting a controlled practice exercise, just like you see in many coursebooks, into a competitive and “active” activity.

Preparation

Take your coursebook and either photocopy multiple copies of an exercise with multiple questions –  or write your own questions. I would aim for a maximum of ten questions. Next, cut the questions into strips, while still keeping the paper together as one, with the end result being that the paper somewhat resembles a hula skirt.

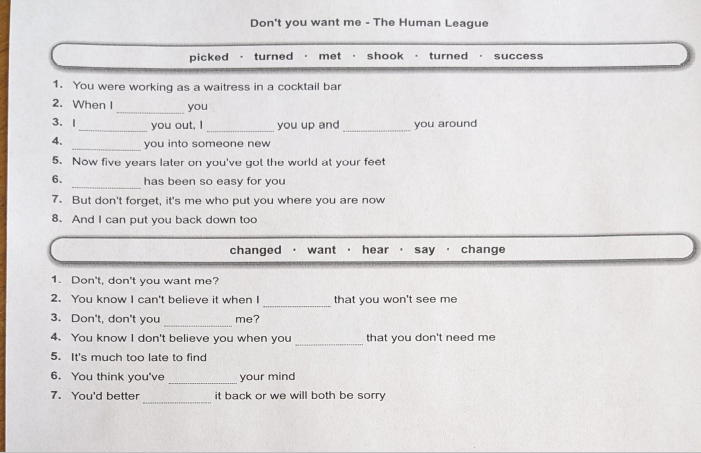
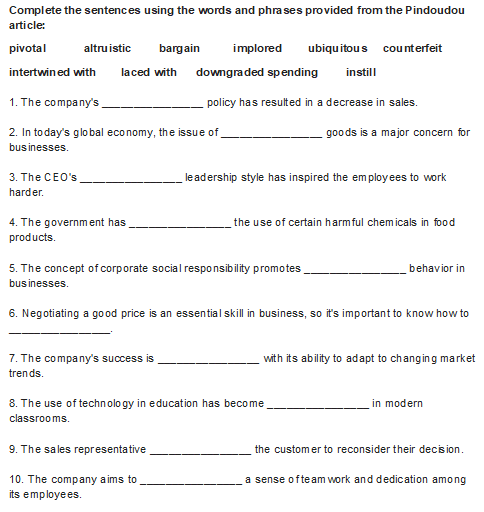
Here you can see an example, with the paper cut, so that each question is a removable strip.
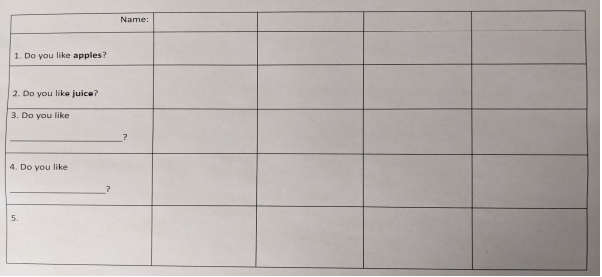
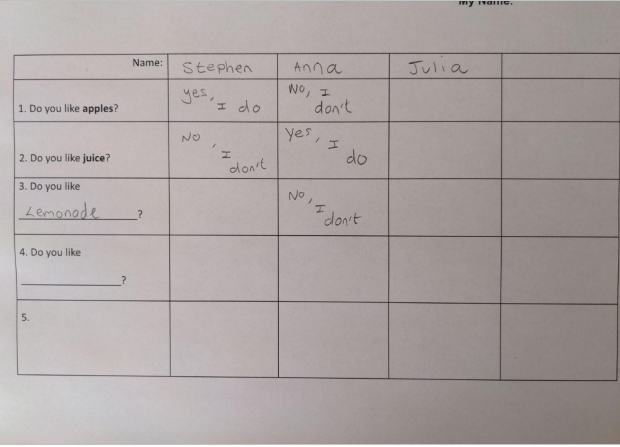
Instructions

Produce multiple copies of the paper with the strips cut and spread them out around your classroom.
Next, assign students into pairs, then each pair nominates a writer and a runner.
The runner has to take a single strip and return it to their team. Then, the writer and runner work together to complete the question on the strip. The activity continues like this until all the papers are finished.

Potential Uses

All the activities here are suitable for a variety of language focuses, but the difference with the strip race is that it makes a dry practice exercise active. I often use it for a review activity, for example checking vocabulary or grammar-based homework, by adapting questions from the homework book.

3. A Song Gap Fill

So far, I’ve shown you activities that are more communicative, with a variety of skills being engaged. The next activity, the song gap fill, focuses purely on listening and writing.

Preparation

Find a song that contains enough examples of your target language and which has clear singing and lyrics. Such songs are usually each to find with a search prompt such as: ‘first conditional songs’ and by focusing on well-known acts such as The Beatles. Next, you extract the lyrics of the song and create gaps where the target language should be.

To generate those gaps you can use an online gap fill generator, which you can find quickly with a search engine. After this, print out the song gap fill exercise and you are ready.

Here’s an example of a gap fill exercise that largely focuses on past simple verbs. I used the gap fill generator at random-idea-english, which includes the missing words.

Instructions

Ensure you have enough copies of the song gap fill exercise for each student and distribute copies to each student.
Students listen and try to fill the gaps. I recommend listening as many times as you feel students need to complete the gaps but generally two or three listenings are enough.

Potential Uses

Like the other activities here, this is easy to adapt, based on your language focus. You can use this activity to add a little novelty to the class. After all, listening to music is a nice break from coursebook audio and with the right songs, you can focus on vocabulary or grammar.

Wrapping up

There are many more activities that I could have included in this article and the activities presented here could be adapted and used in many different ways, but I have kept them to the basics.

There’s a reason for this: if you are a new teacher, I want you to experiment and develop them into activities that work best for you. On the other hand, if you are an experienced teacher, you probably don’t need an explanation of the activities.

I hope these activities will help you in your next classes and beyond that, because they are long term activities that will serve you well.

***

If you enjoyed this article, you might also be interested in this post on rethinking gap fill exercises and this insightful article with the best teaching tips for new teachers.

The Goldilocks Method: A Fun and Engaging Teaching Tool for the ESL Classroom

in Teaching

As English teachers, we’re always on the lookout for teaching tools that are effective, easy to implement and fun. In this post, George Arping from HELTA is sharing a method that meets all of the above criteria and has worked very well for her so far.

The Goldilocks Method has morphed from something I learnt at BESIG many years ago. It’s a positive, feel-good reading tool which shows students how much they actually know.

In the fairy tale with the girl and the three bears, Goldilocks prefers porridge that is neither “too hot” nor “too cold” but “just right”. Likewise, students prefer tasks that are neither too easy (boring) nor too hard (demotivating). It’s exercises that are at the same time challenging and manageable that keep learners engaged and motivated.

The Goldilocks Method can be used in both the virtual and on-prem classroom and has never failed so far.
However, I wouldn’t do this online in a large group as it would take too much time. It works well in smallish online classes or any size face-to-face.

How to use the Goldilocks Method online

First off, find an article suitable for your group to read, or ask them to find something they’d like to read. The latter option can be riskier but still works.

Once you have found a suitable text, follow these steps:

    •  1. Ask a participant to screen share the article.
    • 2. Highlight the whole first paragraph in a colour and ask the group to read the paragraph – either as a group or individually, your choice.
    • 3. Then, ask them if there are any words/ phrases which they’re unsure of and “un-highlight” them.
A hightlighted paragraph with “un-highlighted” words
  • 4. Ask whether they could understand the paragraph even without this word or phrase, based on the context.
  • 5. Continue in this way until you finish the article.
  • 6. Go back to the top of the article and now look at the vocab which they were unsure of; there’s lots you can do here, eg, ask if they think they can explain the word.
  • 7. Once they know what the word is, you can expand on the word family, add prefixes or suffixes, synonyms or antonyms, etc.
  • 8. Finally, check stress and intonation.

I then emphasise to the group how many words and phrases they really know (by the amount of highlighted text!).
After the lesson, I run the words and phrases from the text through ChatGPT and ask for a gap-fill exercise (be careful: you always, always, always have to check what ChatGPT spits out!).
Here’s an example of a Goldilocks-inspired gapfill exercise:

A gapfill exercise

I usually start the following lesson with the worksheet, or send it to them as homework.

How to use the Goldilocks Method face-to-face

The Goldilocks Method can be used face-to-face, and the procedure is almost identical. The main difference is that you’ll have to equip each group with a photocopy of the article and coloured highlighter pens.
Then, simply follow these steps:

  • 1. Get each student to highlight each word they know as they go through the first paragraph.
  • 2. Ask if there are any words that they are unsure of and then continue as above from point 4 onwards.

This method should be engaging and motivating for your learners, because it allows them to expand on existing knowledge while at the same time appreciating how far they have already come.

So enjoy your warm porridge, knowing that good will breed better!

You can find out more about the Goldilocks principle and how it can be applied in the (online) classroom here.

***

If you found this article helpful, you may also like this post on gap-fill exercises.

Role Up! Bringing Adventure to English Learning through Role Playing Games

in Teaching

I recently gave a workshop for English teachers in which I helped them use Role Playing Games (RPGs) in their classes. In this article, I will give you some advice on how to customise an RPG for your own English language classroom.

Today, we’re going to look at The Quiet Year, by Avery Alder*.

It is a map-making, story-telling and community-discussion game. Although it’s pretty simple, it elicits some fantastic English, and can easily be tweaked to fit your class. (Note that if you do tweak it, please respect the author’s rights! Don’t give out copies of the rulebook, don’t pass off AA’s work as your own, give them due credit, etc.)

* I haven’t received any payment or benefits from anybody related to this game, and I’m in no way related to them. I’m just a fan of the game, and I find it works well in the classroom!

The Quiet Year, by Avery Alder

This game costs €6,89 (for the pdf version) and is available here.

To play it, it suggests 2-4 players and 3-4 hours; these figures are very flexible though. You can play with a larger group, or even play two games at once from the same instructions (provided by the teacher). The game can be spread over multiple sessions, or you can play for an hour and leave it unfinished without it being unsatisfying.

Materially, you’ll need…

  • A blank piece of paper to draw the map
  • A few pencils or pens
  • A couple index cards (or smaller pieces of paper – or just draw on the map)
  • Six small dice, 6-sided
  • 20 ‘Contempt’ Tokens – any kind of smallish token will do; they don’t even have to look alike. I use glass beads.
  • A deck of ‘The Quiet Year’ cards or standard playing cards and ‘the Oracle’ (in the pdf)
  • The Turn Summary card (in the pdf)

This can also all be played online – just practise with the tech first!

I’m not going to go into too many details on how to play – you need to buy the rules! – but I’ll provide a brief overview and offer suggestions on how to use them in class.

What do you do? How?!

This is a game about a small community that survives an apocalypse.

The players decide where this community lives, and then draw a basic map of the area – is it a tropical island? A remote alpine village? U-Bahn Alexanderplatz? Next, they decide what resources they have in abundance and what resources are scarce. Shelter might be abundant in an U-Bahn station, but sunlight is scarce.

After this, the game starts – players draw cards, giving them a choice of interesting items to discuss – either printed cards included with the game, or standard playing cards with an included ‘key’. For example:

The players discuss these issues, add details to the map if necessary, and move on to the next turn.

That’s about it!

There are a few rules to pace discussions and keep track of long-term projects the community may engage in, but it’s all very simple and flexible.

When I played it with my classes, we had discussions ranging from:

“How does this food-delivery machine work?” to “Should we approach the stranger on the horizon?” and “Do we need to build a wall for defence or a field for crops?”

They used a range of grammar to discuss previous sessions, results of the in-game events and plans for future sessions, and they also had to manage interpersonal skills to organise their group roles and decision-making process.

All of this was done in English, and each week I could guide the discussion to cover a particular grammar point – discussing in-world achievements using the present perfect. I used this game as open practise at the end of a session, spending about 30 minutes playing through it while I asked the group questions or encouraged discussion to elicit relevant grammar and vocabulary.

How do I prepare?

  • Buy and read the rules. Make sure you know what you’re doing. Play the game with friends if you can! Consider how you will explain the rules to the class: you can prepare a ‘cheat-sheet’ (for example, a turn-order guide is included), or explain them as you go.
  • What level is your class? Some of the vocabulary is quite advanced. Consider how much your learners will understand, and if you can simplify it.
  • Will this game match your students’ interests? If it doesn’t, either don’t play at all or consider how you can change it. It could be as simple as changing the setting or era.
  • Consider group size and timing. You can divide large classes and read the same card each turn to the groups. For small groups, you might need to stimulate discussion. For timing, consider the duration of play in one session and across multiple sessions. Is this an ongoing project or a closing activity?
  • Are there any sensitive subjects to consider? For example, the story of the game features looming conflict – you may need to change this if you have learners who have fled violence themselves.
  • How will you engage less-confident learners? This doesn’t just refer to language confidence. Think about less ‘imaginative’ learners; they may feel lost if they’re forced to create stories. Instead of being pressured  to come up with ideas, they can develop other learners’ ideas, or act as a discussion moderator.
  • How will you keep notes? If you keep notes, you can hope know they’ll be reliable. If your students take notes, they can practise delegation and fast, accurate, writing. Also consider what you will do if you return to the game and everybody remembers events differently, or the notes contain mistakes.
An example of a map created by my learners.

How can I customise this for the classroom?

The materials:

  • Think about the story. The story of the game focuses on a small community who survived a conflict that still looms over them. Do you need to alter this story? Will it interest your group? Is anybody in your group sensitive to the themes? You might not even need a story at all.
  • How much will you customise the game? By default, it focusses on a small community ravaged by war. This story can change dramatically without affecting the core gameplay; you may however need to rewrite the events cards/table if you make big changes to the story. The game could be set in an ordinary office in Berlin – if you are willing to rewrite a lot of the cards! For example:
    “There is a café near the office everybody avoids. What happened there?”
    or
    “There is a café near the office that attracts office workers. What does it sell?”
  • How will you use the printed materials? You can read the cards to the group/class yourself, ensuring that everybody moves at the same pace and you can explain difficult terms. Alternatively, the learners can read the cards themselves, requiring the reader to speak clearly to the group. Will you need to simplify or modify the printed materials?

Your own thoughts:

  • What are the learning goals? You can divide this into ‘discussion’ and ‘world’. Are you focussing on communication techniques – for example, making suggestions and polite disagreement? Or are you focussing on the world of the game itself?
  • How do the learning goals and the village work together? Think about the language you are focussing on (“”How about we…?” / “What have you built?”) – and how the game can elicit it. Can you steer the discussions towards these goals? Or, if you’re just trying to encourage discussion and build confidence, consider your role as ‘moderator’, keeping everybody engaged.
  • How will you monitor and guide the discussions? The game has a built-in structure that ensures everybody gets a say. Does this work for you? You might need to encourage discussion, or you might need to keep things moving along.

Play the game!

  • Most of this is covered in the game rules themselves… But consider what you need to focus on as an English teacher.
  • When will you offer corrections? Be careful not to interrupt the flow of the game; you could collect errors for post-game activities.
  • How will you manage the pacing and encourage or guide conversation? Read the provided rules and consider if these will work for your group. Do you need a tool as ‘blunt’ as a timer? A deadline could add drama to proceedings, but it could also be an unnecessary source of stress. Remember that the goal is to teach English, not finish the game.
  • How will you monitor shyer students? Make sure everybody is engaged, and more confident learners don’t hijack the discussions.
  • Who will be taking notes or minutes? This could be you, it could be a single student, it could be a group activity or it could be a rotating position. You could also make the students decide, as part of interpersonal skills training (see the next point).
  • Does the teacher distribute such roles, or do the learners manage this amongst themselves? To keep the game moving at a suitable pace and to avoid confusion, you might want to assign roles yourself. This also allows you to assign students to roles that they need to practise. Letting the learners decide themselves, however, will help build group cohesion and English-language organisation and interaction.
  • How will your groups handle disagreement (check the ‘Contempt’ rules in the game)? Make sure that nobody makes any real-life enemies! There are rules that cover disagreements between characters; you might need to remind your players that they – and their disagreements – represent groups of people in the community. Don’t let it get personal, and if it does – stop the game.

It doesn’t end there!

  • How will you wrap up each session? The learners could write news articles or reports about the events of the game. They could make predictions about future of the community. It could form the basis of a story-writing exercise, or for a future role-playing game. There are lots of directions you could take this in!
  • Can any of the themes that emerged be discussed in future lessons? How did the community react to… climate change? War? Strangers? How did the players themselves deal with these issues?
  • What was group interaction among the players like? This could include how they delegated work, what their decision-making processes looked like and what kind of group hierarchy they used. You can ask them to compare this to how they act when speaking their native language.
  • What were the key themes of the game itself? There is a ‘sister game’, The Deep Forest, that focusses on questions of “cultural continuity, adaptation, and the looming worry of re-occupation” (description from the Quiet Year Rules). As English teachers, these can be very relevant fields for discussion – how do we teachers and learners look at the cultural-linguistic juggernaut that is the English language? Did any such ‘broader themes’ emerge in your games?

Video recommendation:

Here, you can find a short video tutorial on how to play a simplified version of “The Quiet Year”.

It really doesn’t end there!

I could write more. Much more. But I won’t – for now!

Look out for a future article on the game Lasers and Feelings! This is a more ‘traditional’ – but very simple – RPG that encourages players to describe their actions and environments, create plans, discuss courses of action, justify decisions and work together to achieve success.

It’s a game of space travel and adventure, but in my next article, we’ll boldly go where it’s never gone before – the English classroom! [Terrible joke! See me – Ed.]

***

If you enjoyed this article, you may also be interested in graphic facilitation for English teachers.

Everybody’s Bad at Charts – but Your Students Don’t Have to Be

in Teaching

If you want to send your ESL students into the business world as the complete package, you’d better not neglect chart narration skills. Without them, the student is liable to get tongue-tied in front of an audience. Here’s how to help your students hone their ability to describe charts.

Even though the United States has the world’s largest economy, the textbook publishers essentially do not produce business ESL books for that market. American instructors could use the British books that publishers import en masse, but when I’ve tried that, my students have wound up talking about employee flow in and out of the company when they meant to talk about revenue, they got other vocabulary wrong, and developed further issues.

The instructor could stop at different points and say, “We don’t use that term in the US. This is what we say here,” and provide the American terminology, but students always believe their textbooks over their own notes. So when they’d come back to class, they were always using terms unsuitable, sometimes unintelligible, in American business.

When examining business ESL textbooks for use in an American class, my quick method used to be to look for characters named Nigel and Liam. If either of those guys appeared — sometimes they both appeared — I knew the book would be unsuitable for my classes.

Everybody’s bad at charts

This dearth of published textbooks has an advantage, though:

We have to scrape together our own materials and get creative about activities. This will cause alert instructors to adapt to the specific students’ needs to a degree that never happens when a textbook is used. It also reveals weaknesses in the students’ business English skills that would never come to light when using a textbook.

One of these weaknesses is always an inability to verbally describe charts. No matter how much English they have acquired or how fluent they are, foreign speakers of English are almost always terrible at explaining what’s going on in a chart. (I can’t do it in my foreign languages either.)

A foreign businessperson might give a powerful, articulate presentation in impeccable English, but as soon as the chart comes up on the screen, he or she is reduced to “go up”, “go down”, “start”, “stop”, and other terms far below their proficiency in other situations.

Describing charts is a necessary business skill, and it should be included in business ESL courses, but evidently it’s neglected. Doing it well requires learning a lot of idioms, most of which seem to come from sledding, car racing, aviation, diving and even skateboarding.

Chart jargon 101

On a chart, a trend can rocket higher or stably chug upward, rise steadily or abruptly. If the trend reverses course, it may fall off a cliff, drop precipitously, plunge, take a dive, etc.

If the decline is slower, the trend might slide, skid or gradually decline. While the student might say a trend “stays the same”, native speakers might say it holds its level or continues sideways.

If the trend rises and flattens out, it plateaus. If it declines and flattens out, we might say it bottomed out and stayed there, or even that it’s found its level.

A stock chart might form a head-and-shoulders pattern, a flag, a pennant, a double top, a double bottom, or a cup and handle. On many kinds of charts, a trend might gap up or gap down.

Seriously, you must be kidding!

Chart reading exercises can come in handy in other ways too:

In one business ESL class I had two Indian engineers who said their most immediate issue was learning to hold people’s attention at meetings. In addition to their strong Gujarati accents – which stressed even the most cooperative listeners – they pointed out that they were very serious men and had no skill at cracking jokes. Their explicit request was for me to teach them how to wisecrack.

It turned out that one very effective way to do this was for me to print boring economic charts from the Wall Street Journal. We’d juxtapose them, and as the two students verbally compared them, we’d look for openings for funny quips. In one of the best sessions, they compared the unemployment trend with the changes in consumer spending. It turned out that spending rose at about the rate that employment was decreasing, so they put together several jokes relevant to that surprising pair of trends. More joke opportunities arose when comparing other dry economic indicators.

You can learn plenty about describing charts from watching CNBC or Bloomberg, and there are plenty of web pages explaining how to describe chart patterns.

***

If you enjoyed this article, you might also be interested in teaching English for Specific Purposes (ESP).

Success with Less: The 20-Minute Formula for Better Lesson Planning

in Teaching

For most teachers, the best part of the job is the actual teaching. We love engaging with our students in class and creating those “lightbulb” moments of clarity. The part of the job that most teachers don’t love? Lesson planning. Here’s why, and what you can do to make lesson planning easy and effective.

Planning can be time-consuming, stressful, and overwhelming. Most dedicated teachers end up doing far more preparation than they get paid for. School directors often expect (or even require) detailed lesson planning, but give little guidance on how to go about it.

So it’s no wonder that many teachers view lesson planning as a necessary evil.

But here’s the thing – it doesn’t have to be. With the right strategies, you can plan lessons that are more effective and more fun, without the guesswork and stress. And you can drastically reduce how long it takes.

Choose ONE Main Focus

When choosing a focus for your lesson, less is actually more. My golden rule for effective lesson planning is this: It’s better to teach a lot about a little rather than a little about a lot.

Here’s why it matters.

Option 1

You teach a lesson in which the students learn some new adjectives related to jobs, then they do a listening exercise about climate change, and then they study the present perfect before writing a short paragraph about their hobbies. The lesson ends with a class debate about the pros and cons of social media.

The students leave with their heads full of new information. But because the focus was on so many different things, they didn’t get a chance to master any of it. In fact, they can’t even remember a lot of it.

Option 2

You teach a lesson on 8 vocabulary words related to work. The students start by having a short discussion in pairs about what kind of job they would like, then read a sample job advertisement which contains the target vocabulary words for the lesson. From there, you clarify the meaning, form, and pronunciation of the 8 words before the students practice those same words in a “describe and guess” flashcard game. The lesson ends with a job interview role play in pairs.

The students leave feeling confident that they can use all the vocabulary they learned in the lesson. They certainly don’t know all the words in English related to work yet, but they now feel much better prepared to talk about work in English.

It’s better to teach a lot about a little rather than a little about a lot.

Clearly, option 2 is more useful for the students. Option 1 had so many different aims that the students didn’t end up confident in any of them. Option 2 provided one clear focus. By the end of that lesson, the students’ abilities had noticeably improved in that particular area.

The first step in planning a successful lesson is to choose one of the following skills or systems for each 60-90 minute lesson:

  • reading
  • listening
  • speaking
  • writing
  • grammar
  • vocabulary
  • functional language

Obviously, any lesson will contain almost all of these aspects in one way or another. The point is to make only one the main focus and then build your entire lesson around that.

Use the Right Framework

Once you’ve determined the lesson type from the list above, the next step is to use a lesson framework. A framework is basically a template or outline corresponding to the lesson type. It’s made up of a list of stages (typically with one activity per stage) and each stage has an aim (a justification for how that stage contributes to achieving the main aim of your lesson).

The framework you use is determined by the type of lesson you’re teaching. A listening lesson has a different framework than a grammar lesson. Because these are very different aspects of English, the way we approach teaching them will be different.

For example, a reading lesson framework might look like this:

Stage Aim
Lead-in to set the context of the lesson; to engage with the topic and warm up
Gist Reading Task to practice skimming for the main idea of the text
Vocabulary Pre-teach to clarify potentially blocking words in the text
Detailed Reading Task to practice reading intensively, for more in-depth comprehension
Productive Task to practice speaking fluency in the context of the text

So any time you teach a reading lesson, you can use this same framework – just with a different text and relevant activities for each stage.

Lesson frameworks are the #1 way to streamline your planning process and make your lessons more effective. Once you’re familiar with the different frameworks, no longer have to waste time thinking about what kind of activity to plan next or how much to include in your lesson. You simply follow the outline.

Get the Most Out of Your Material

Another benefit of using a framework is that it helps you shape your material into a cohesive, intentional lesson. If you’re teaching from a coursebook, you can now evaluate what’s on the page and determine which activities fit into your framework and which don’t. Take the activities you need, slotting them into the appropriate stages, and cut out the rest. Is the coursebook page missing a gist task? No problem – now you know exactly what you need to supplement.

Remember – less is more. Your entire reading lesson should be designed around one text. Your entire vocabulary lesson can be designed around one set of 6 – 10 vocabulary words. The beauty of this is that you get the most possible mileage out of your material, and you don’t spend time looking for a bunch of different random activities to fill up your lesson time.

You can use frameworks with authentic material as well. Perhaps you’ve found a short TED Talk you’d like to use for a listening lesson. Use the listening lesson framework to inform the activities you design around the video.

Tips for Saving Time

picture of an hourglass on a table top

Once you get really comfortable with the different lesson frameworks, these will be your biggest timesaver, because you’ll no longer have to create lessons out of thin air. You’ll have a handy template up your sleeve for any possible lesson type or material.

If you’re looking to reduce your planning time even more, here are a few additional tips help you.

  1. Plan backwards. Can I let you in on a lesson planning secret? Plan the most important activity first. And the most important activity in your lesson should never be your lead-in. The lead-in is just there to quickly introduce the topic and get the students engaged. In a 60-minute lesson, this should take five minutes or less.

If you start planning the lead-in first, it’s easy to fall down a rabbit hole of activity options. Should I start by showing a picture or a video clip? Should the students discuss some questions in pairs? Before you know it, you’ve spent 30 minutes “planning” and haven’t even worked out the first activity yet.

Instead, start with the “main event” of your lesson. For example, in a reading lesson, this would be the detailed comprehension task. If you’re using a coursebook, this will most likely already be provided for you. Boom! That stage is done. Now work backwards from there. By the time you get to the lead-in, the rest of your lesson will be planned, and all you need to do is tack a quick 5-minute warm up activity (in the context of your reading text) onto the beginning.

  1. Set a timer. If you find yourself spending an hour or more planning a single lesson, my timer trick may help. Set a timer for 15 or 30 minutes and tell yourself you have to have the lesson planned by the time it goes off. You don’t need to have the perfect visuals ready to go or all your instructions written out. You just need to have enough so that you could feasibly walk in and teach it: the stages, plus the aim and activity for each stage.

Challenge yourself to put the lesson together without worrying about every little detail. THEN go back and add any necessary embellishments afterwards, once the timer has gone off. You may even realize you don’t need to add on as much as you thought.

  1. Build up your resource library. I recommend keeping a folder (physically or digitally) with your favorite activity ideas. That way, you can easily pull one out whenever you need to supplement a stage in your lesson.

And remember – just because the activity doesn’t focus on the exact grammar point you need, it doesn’t mean you can’t use it. Many activities can be easily adapted to practice different language. For example, a game like Find Someone Who can be used to practice anything from the present simple (“Find someone who plays tennis / has a dog / speaks 3 languages”) to the present perfect continuous (“Find someone who has been studying English for more than 5 years / has been living in the same house since they were a child”).

If you like the format of the activity, you can save a lot of time by creating different versions of it rather than trying to find something that’s already tailor-made for the exact language point you’re teaching.

If you’re looking for more guidance on your teaching and planning, feel free to stop by teflhorizons.com. You can also download the free Guide to Lesson Frameworks here for an easy reference.

***

1 2 3 8
Go to Top